Wednesday, June 10, 2015

Chicken with Tortilla

A couple of days before, I had seen a post on Facebook for Mexican chicken - it was a post shared from My Litter by a friend - the photo belongs to My Litter, I have modified the recipe as some things are not available in Australia.  This was the start of my inspiration.  


You will need:
  • 2 large chicken breasts
  • 2 large tomatoes
  • 250g philadelphia cream cheese
  • powdered burrito mix (we used Old El Paso)
  • tin of corn kernels
  • tin of black beans (in the Mexican section at the supermarket)
  • 1 small chilli (to taste)
  • packet of tortillas (or make your own - they are only flour, water and effort!)

In either an oven proof dish, pressure cooker, or crock pot - put the whole chicken breasts in the bottom of the pot. Drain off the corn kernels and add. Drain and rinse off the black beans and also add to the pot. Add the cream cheese, burrito mix, the chilli and chop up the tomatoes as well - all these go into the pot - don't worry about mixing it, just pop it all in.

(photo from My Litter)

If you are cooking it in the pressure cooker - I cooked it on 2 curry cycles (about 22 minutes per cycle).  If you are cooking it in the slow cooker you need 4 hours on high, or 6 hours on low. In the oven, make sure its covered and bake on about 160deg for 4-6 hours (keep an eye on it).

By far, the pressure cooker is the most energy efficient and fastest way (great if you work long hours). Once its cooked, you will not only smell it, but the chicken will just shred with a fork when you mix it all around.


By now, your Mexican chicken will be just about ready. Remove from heat and stir with a fork to shred the chicken - if the chicken totally falls apart - its ready!  Refrigerate half of the mixture for another meal (based on serving 3 people). Serve with tortillas, sour cream and cheese - make your own tortillas, its so easy - mix plain flour, water and a dash of olive oil to make a dough, knead until smooth, rest for 10 mins, then roll out very finely - pan fry gently in some oil and serve (yes, I think I just saved you about $6 in tortillas alone).


You can take this dish one step further over two nights - only use half of the cooked amount of mixture above - for the second dish, reheat and serve with steamed rice.



Saturday, June 6, 2015

Dukkah

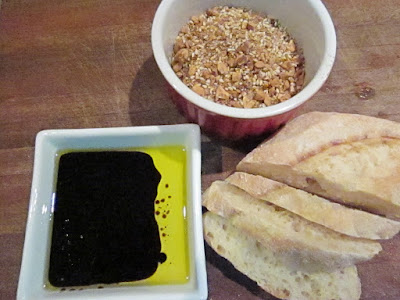
Its been a long long time since I've made dukkah - freshly made, dished up with some olive oil and balsamic reduction, crusty bread and a glass of wine....just the way I like it.

So very easy to make - keeps in an airtight container - not only can you use it as a dipper, but also on top of salads, roasts, steak, vegetables....delicious.


You will need:

110g dry roasted nuts (hazelnuts or almonds)
80g sesame seeds
2 tablespoons ground coriander
2 tablespoons cumin powder
1 tablespoon salt flakes
1 tablespoon ground pepper


Heat the nuts up in a pan (or in the oven) - if they are hazelnuts, you will need to rub off the skins when they cool.

Toast sesame seeds in pan until golden - remove from pan (watch these as they will toast very quickly.

Toast up the herbs and salt until fragrant - remove from pan.

Process the nuts in a food processor (or do it by hand with a knife) until finely chopped.

Mix all ingredients together.


Store in air tight container.


Cheep Chicken Country Bake

This is an absolute budget breaker - we were down to our last scrappy vegetables and 6 chicken legs - you know what guys are like - "what? I only get 2 legs?" - well, make it go further and cook up a heap of vegetables with it - you will not only finish cleaning out your fridge, but this is a super "cheep" meal (pardon the pun). Even if some of those veges are looking a little tired, you can still use them in this dish.


6 chicken drumsticks
3 pieces bacon - chopped in chunks
3 potato - peeled and chopped
1 sweet potato - peeled and chopped
2 brown onions - peeled and chopped
1 red capsicum - remove flesh and seeds, chop
1 fresh beetroot - peel and chop
3 large mushrooms - thickly sliced
1 head garlic - peeled
Sage
Rosemary
Bush seasoning
All spices seasoning
Olive oil
150g butter
Salt

Rub the drumsticks with seasoning and leave overnight to marinate.

Chop up vegetables so they are about the same size.

In a large baking dish, place all ingredients. Drizzle with olive oil and fresh herbs. Chop up butter and place around dish. 


Bake 180deg for about 1.5 hours.

Note: you can use any vegetables you have which need to be used up for this dish. Putting it together tonight, I had my doubts that 6 drumsticks would be enough for the 3 of us, the vegetables and bacon made it go that much further. If adding beans, add for the last 10-15 minutes only. Don't throw away the juices from the pan, drizzle them over the meal when plating up.


Lamb Rub

Ok, so this doesn't just have to be for lamb - it could be for beef, pork or chicken too - simply mix the ingredients and then rub all over the meat - let it rest - overnight is better for more flavours - then grill, roast, fry - whatever takes your fancy.


You will need:

2 tablespoons brown sugar
2 teaspoons cumin
2 teaspoons smoked paprika
2 teaspoons ground coriander
1 teaspoon cinnamon
1 teaspoon chilli flakes
1 teaspoon salt
2 teaspoons tumeric powder


mix all ingredients

rub over meat

let rest for at least 1 hours to absorb flavours


Cream cheese frosting

This is a really simple frosting to make.  Fluffy and creamy - delicious.  You can add whatever flavour you want, here's the basic recipe.


100g softened butter
100g cream cheese
2 cups icing sugar
Vanilla essence to taste.


Beat the butter and cream cheese until smooth and creamy.  This is really important - if the butter and cream cheese isn't smooth and creamy and you can still see lumps of butter - then keep beating it! If you don't, then you will have yucky lumpy icing.

Once the butter and cream cheese is nice and smooth (taste it, should be creamy) gradually add the icing sugar. Don't add it all at once or you will spend he rest of the day cleaning up the kitchen. Add about a tablespoon of vanilla essence to taste. The end consistency should be about that of thick whipped cream - ice your cakes.

For something a bit different, you can add cocoa powder (sifted); or purée some fresh or frozen berries; zest of lemon or orange; anything that takes your fancy.


Balsamic Reduction

So, we have all seen Balsamic Reduction - I refuse to pay full price for something I can create for myself at a fraction of the cost - especially when all it takes is time to create.


2 bottles balsamic vinegar

2 cups brown sugar firmly packed

Remove the lid and plastic cap from the bottles - keep both as you will need for later when bottling it back up again.


Pour the balsamic vinegar into a wide saucepan - you want the surface area so it reduces quicker. Add the brown sugar. Set on stove on high heat - bring to boil, then reduce temperature to simmer.


Cook for about an hour - you want it to get to a syrupy consistency - keep testing it with a spoon and see if it coats the spoon - once it coats the spoon - remove from heat and allow to cool to about body temperature. Note: this will reduce to about half the quantity of liquid you started with.


Pour back into bottles (don't pour it into the bottles if it is too hot as bottles may crack).


Serving ideas:

  • use as a marinade or part of a marinade for steak, lamb, chicken
  • serve with crusty bread and home made dukkah with olive oil (my favourite)
  • use as a salad dressing
  • use for extra flavour when cooking up a large batch of capsicum and chillies


Cup Cakes

These are so simple, and delicious - try cutting off the tops when they are done and put in a spoonful of strawberry jam and some whipped cream.....


1  1/2 cup self raising flour
2/3 cup castor sugar
125g butter, softened
2 eggs
1 teaspoon vanilla
2/3 cup milk.


Firstly, make sure the butter is definitely softened - otherwise it ends up lumpy.

Put all ingredients into a mixing bowl. Beat on low speed until combined, then on medium speed until batter is smooth.


Line cupcake tray with paper liners. Oven to 160 deg C.  Put spoonfuls of mixture into patty pans to about 3/4 full.  Bake about 15-20 mins until golden.


Once cooled, gently make an insertion from the side of the cupcake toward the middle (in the shape of a smiley face) - spoon some jam into the slot.


And generously cover the cakes with frosting.


Schnitzel for Jackie


Dear Jackie, whenever I make my normal chicken schnitzel I always think of you and wish that you could enjoy it as much as I do.  This recipe is for you my sweet - a gluten free version - we taste tested it and our food critic, William, gave it the 10 thumbs up - so much so, that with the small amount of leftovers he was using for lunch, he made an executive decision to finish it off for second breakfast this morning before his dad could get it.....gone! Vanished! A good sign that it was a success...


  • 2 Chicken breasts or 700g tenderloins (depends how many you are feeding)
  • 1/2 cup finely grated Parmesan cheese
  • 1/2 cup chopped fresh basil
  • 1/2 cup gluten free flour
  • 2 eggs
  • 1/2 cup milk
  • 2 cups quinoa flakes*

If using chicken breasts, slice them to make schnitzel thickness fillets.

Combine the grated cheese, fresh basil and quinoa flakes in a bowl.  In a second bowl combine eggs and milk, whisk together. Place flour in a third bowl.

Dip the chicken into the flour, then into the milk/egg mix, and then coat with the quinoa crumb mix.

Heat oil (not olive oil) in pan.  Cook schnitzel until golden on each side. Keep warm in oven until ready to eat.


Note - depending how many you are feeding will depend on how much to mix up.  Keep the crumb blend so that you can easily see the herbs and have a decent amount of Parmesan throughout. The Parmesan adds to the crispness of the crumb and adds delicious flavour.

*Quinoa flakes are an alternative to breadcrumbs, you will find them in the health food section of the supermarket or health food shop. 

Saturday, May 30, 2015

Twice Cooked Pork Belly

This is over a couple of days - well worth the effort though - I think - well, put it this way, it takes a while to make but not long to eat!

I am really really sorry - the finished product did not get a final photo - it was eaten too quickly for me to grab the camera - you will just have to trust me when we said it was delicious.


Ingredients

Pork Belly
1 onion
8cm ginger
3 heaped teaspoons of garlic (crushed)
3 red hot chillis
2 teaspoons of chilli or chilli flakes, or crushed chilli (jarred)
2 teaspoons smoked paprika
2 teaspoons dried oregano
1/2 cup plum sauce
1/2 ketjap manis
1/2 cup malt vinegar
1/2 cup rice wine vinegar
1 cinnamon stick
4 star anise
1/2 brown sugar


Day 1

Place the pork belly into the bottom of the slow cooker or pressure cooker. Combine rest of ingredients and pour over pork - you may need to add water if it doesn't look like enough liquid.  Cook on slow cooker for 6 hours, basting with sauce as you go.  If cooking in pressure cooker use the pot roast setting and do 2 cycles.

Remove from sauce - place in dish, put another dish on top of it to weigh it down. Refrigerate over night.  Strain and keep left over sauce.

Into the pressure cooker

Strain off juices, keep juices and discard solids

doesn't look too apetising at this stage...wait until its finished...drool


Day 2

Cut the cold cooked pork belly into cubes. Place in baking tray on paper, baste with left over sauce. Put into hot oven (210 deg C) and cook until golden.

While the pork is cooking in the oven, put on some rice - if you do have a pressure cooker, cook it in that - 1 cup of rice serves 3 of us. Place rice in bottom of pressure cooker, add water to cover so that rice takes up approximately half the depth of the water. Cook on rice cycle.

Put the left over sauce into a pan and onto the stove over medium high heat to thicken and reduce.

Serve with steamed asian vegetables, rice and sauce.


Lemon Cheesecake (no bake)

I love lemon cheesecake - this on is easy as its no bake - the longer you leave it (a day or two) before eating, the more lemony it is in flavour.


Ingredients:

Base:

500 g sweet biscuits - I used butternut
200g butter, melted

Filling:
2 x 250g cream cheese at room temperature
2 x 400g tins sweetened condensed milk
2 teaspoons vanilla extract
juice and zest of 5 lemons
3 tablespoons gelatin 


Blend the biscuits until they are crumbs in the processor - while processor is still running, add melted butter.

Press crumb mix into the bottom of a lined springform pan (I used 23cm) and up the sides.  Place in freezer for about 30 minutes. If it looks like there is too much butter, use paper towel to soak up the excess.


Using a blender, beat the cream cheese until smooth, light and fluffy.  Add the condensed milk, vanilla, lemon juice and zest.  Beat until smooth and well combined.  Boil water, pour into a cup (about 1/2 cup boiling water), add gelatin and stir until combined and there aren't any lumps. Add to lemon mix. Beat well.

Remove tin from freezer. pour lemon mix over base. Refrigerate at least 6 hours or overnight until set.


Things to note: I love lemon! I love the zest of it, and when it is in a sweet, I love the sweet and sour zingy thing that happens in my mouth when I eat it - the more zing, the better it is.  This cheesecake will improve with flavour if you leave it for a day or two before consuming.


Chicken Schnitzel

My kids love this schnitzel - you could substitute the chicken for veal as an option - great to keep for lunches the next day (if they last)


Ingredients

  • 1kg chicken breast (or use tenderloins)
  • day old bread - crumbed - or use packaged breadcrumbs (won't be as nice)
  • bunch fresh basil
  • 1 cup Parmesan cheese - grated
  • 2 eggs
  • milk
  • 1/2 cup flour
  • oil for cooking (do not use olive oil)

Firstly you need to prepare your breadcrumbs. I use day old bread - the stuff nobody wants to eat - put it in the food processor and process until fine crumbs.  Add the handful of fresh basil leaves, and grated parmesan cheese - process until well mixed but still resembling breadcrumbs.


If you are using chicken breast, you will need to fillet it to thinner slices rather than one thick chunk. Tenderloins will not need filleting.

In a bowl, whisk egg and milk.

In another bowl, place the flour.

In a 3rd bowl, place your breadcrumb mixture (if you do not want to make your own breadcrumbs, use packaged ones).

Dunk the chicken fillets into the flour mixture first, then into the egg mixture, finally into the breadcrumbs. Place on plate.


Heat oil - to see if oil is hot enough, drop some bread into the oil - if it fries then it is hot enough - if nothing happens wait a little longer.

Cook the schnitzels until golden on each side.


Corned Beef

When I was a kid, this was one food I absolutely hated. I remember once we went on a trip to Cooma and we were billeted out for our accommodation. My girlfriend and I (we were about 17 at that stage) were sent to a shabby old house with cobwebs hanging throughout the kitchen and it was just really grotty.


We were dished up corned beef with white sauce - and from that point on I was scarred for a very long time.


Fast forward 30 years and I find a recipe by chance for corned beef - I had been looking for something unusual and definitely something that was on the cheap side for sandwiches for lunch.... I found a recipe similar to this - I think that the cloves and cinnamon did it for me and now its a lunchtime favourite here for us.


Ingredients:

1 piece of corned beef (sized to suit your needs)
1 sliced onion
4 star anise
1 cinnamon stick
2 teaspoons of allspice
1/2 cup brown sugar
2 tablespoons peppercorns
8 cloves
2 bayleaves
2 red hot chillies


Wash the meat!

Place all ingredients in the bottom of the pressure cooker. If you have a trivet that fits into the pressure cooker, place the meat on this.  Add extra water to bring liquids up to rack of trivet. Cook for 2 cycles on Pot Roast setting.


If using a slow cooker, same as above, no trivet -6-8 hours on low, turning meat regularly so it doesn't dry out.

Once cooked, into the fridge - slice up and sandwich with pickles and cheese - yummmm

Or serve as a main with mashed potatoes, strain juices and thicken to make a sauce.


Saturday, May 16, 2015

Sausage Rolls

My boys always loved home made sausage rolls - we knew what went into them - and they would eat them in no time - this recipe is perfect to freeze and keep for a quick meal later - no need to defrost, just straight into the oven - you'll know when they are cooked - they will be golden and just begging to be devoured.


You will need:-

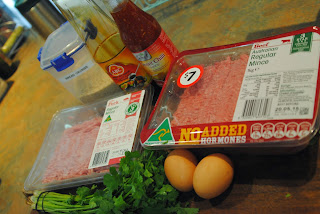
  • 1kg beef mince
  • 500g pork mince
  • 12 sheets puff pastry
  • 1 cup chopped corriander
  • 2 eggs
  • 1 cup breadcrumbs
  • 1/2 cup  Kepap Manis (Indonesian sweet soy sauce)
  • 1/2 cup sweet chilli sauce


Separate your sheets of puff pastry and spread out so they can defrost - use a knife to gently separate the sheets. Do not remove the plastic divider sheets, you will need these later.

Place all ingredients (except for the puff pastry of course) in a bowl - mix well by hand. I grab and squeeze to mix this - I've found its easier and quicker - just dip your hands into it, grab and handful, lift and squeeze - repeat.


You want it to be mixed to a consistency of rissoles - firm but not dry.


Divide the mixture up into 12 even quantities.


Take one of the mince balls, and spread it out over half of one of the puff pastry sheets. Repeat for each ball to a sheet of pastry.


Start to roll up the pastry, leaving the plastic behind.


Continue to roll up the pastry to the end of the plastic. Then roll the plastic back around the newly formed sausage roll.


Next, cut the roll in half - you now have 2 sausage rolls with the plastic wrapped around the outside of the sausage roll (you don't want it rolled inside the roll - yuck!)


To cook: heat oven to about 200ºc and place sausage rolls on lined tray - make sure that the edge of the roll is on the underside of the sausage roll to prevent it unravelling when it cooks.  


Cook until golden. Depending on your oven, you may need to rotate the tray part way through cooking to ensure even cooking. If they explode a little (like mine) its because the mince could probably have been spread a little further before rolling it up.


The rest of them? Place them in a plastic container in the freezer - the sheets of plastic will stop them sticking together in the freezer. To cook, just put on a lined tray (no need to defrost) in oven at 200ºc until golden.